When you step into the role of a Gimkit host, you’re doing more than just pressing “play” on a quiz game. You’re orchestrating an engaging, high‑energy, interactive learning experience that can genuinely motivate students, spark conversation and embed knowledge in a memorable way.
In this article, we’ll explore everything you need to know to host a top‑notch session on Gimkit — from the setup to the best practices, troubleshooting tips, and advanced strategies to elevate your game‑based pedagogy.
Let’s dive in and transform your next revision session, classroom review or remote learning activity into something your learners will look forward to. Read on, and by the end you’ll feel confident and ready to lead as a Gimkit host.
What Is a Gimkit Host & Why It Matters
As a “Gimkit host,” you’re the person who initiates and manages a live Gimkit game session. That means you select the kit (question set), choose a game mode, configure the settings, share the join link/code with students, and monitor the session from your host screen. Gimkit Help+1
Being a great Gimkit host matters because:
- You set the tone: A well‑hosted game feels polished, purposeful and fun—not chaotic or last‑minute.
- You guide learner behaviour: Through your configuration choices (e.g., allow late joiners, nickname generator, time limit) you influence student engagement, focus and fairness. Gimkit Help+1
- You create meaningful review: It’s not just about speed and points—if configured well, the game becomes a targeted revision tool, giving you reports and insights afterwards. Gimkit Help
- You handle logistics so learners simply jump in and play. The simpler you make it, the less friction, the more engagement.
In short: the host role elevates Gimkit from “just a quiz” to a thoughtfully designed learning experience.
Step‑by‑Step for Hosting a Live Gimkit Game
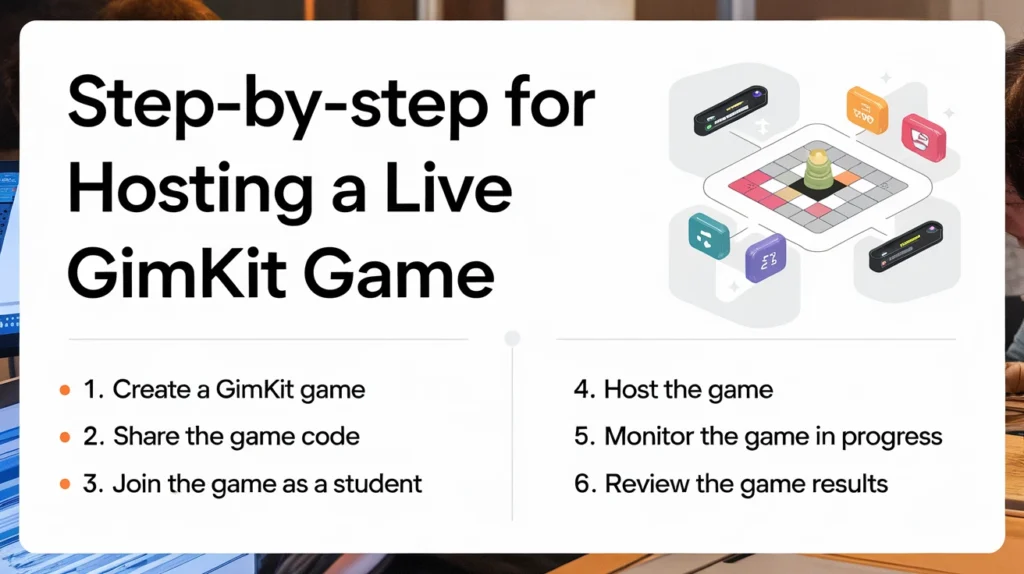
Here is a clear, actionable walkthrough to get you started as a host on Gimkit.
Select or Create Your Kit (Question Set)
- Log into your Gimkit account and navigate to your Dashboard.
- Either create a new “Kit” (question set) or choose an existing one you own.
- Note: If you host a public kit you don’t own, you can still host — but you won’t obtain the detailed game reports. Gimkit Help
Choose “Play Live”
- In your dashboard, click the green “Play Live” button next to your chosen kit. Gimkit Help+1
- This opens the Mode Picker, where you’ll select the game mode.
Select the Game Mode
- Gimkit offers multiple modes (Classic, 2D modes, and other interactive formats).
- Use the “Mode Picker” to browse and select the best mode for your group’s purpose. Gimkit Help+1
Configure Game Options
On the game options screen you’ll see key configuration settings, such as:
OptionWhat you setWhy it mattersGoal or win conditione.g., “first to $500”, time limit, number of questionsDetermines length & competition levelJoin in lateToggle on/off whether participants can join after startControls fairness if you start on timeNickname generatorEnable safe auto‑names instead of free textHelps manage names, avoid distractionsMaximum players / class connectionLimit number of players, connect pre‑set classesImproves stability, organizes groupsGimkit Help+1
Share the Game Code / Link
- Once settings are set, click “Continue” and you’ll get a Lobby tab with a game code, QR code or join link. Gimkit Help
- Share this code or link with your learners via chat, classroom board or verbally.
- Students go to gimkit.com/join, enter the code (or follow link). Gimkit Help
Start the Game
- When you’re ready, click “Start Game” in the lobby (button placement differs slightly depending on mode). Gimkit Help+1
- You’ll move to the live session screen where you monitor the leaderboard, manage participants and run the game.
Monitor & Manage During the Game
- In 2D modes you can choose to be a spectator or join as a player. Gimkit Help
- You can also remove inappropriate players, end the game early, add time (in 2D modes) or view reports. Gimkit Help
Post‑Game: Obtain Reports and Review
- After the game ends, click View Report to see class performance, individual answers, and export as PDF if needed. Gimkit Help+1
- This data is gold for reflection, identifying misconceptions and planning next steps.
Best Practices for Hosting High‑Impact Games
Here are actionable strategies to make your Gimkit hosting not only smooth but also educationally powerful.
Plan With Purpose
Before you click “Play Live”, ask:
- What learning outcome am I targeting? (e.g., vocabulary review, biology terms, maths facts).
- What difficulty level will best match my students?
- Which game mode will best serve this objective (fast‑paced vs calming vs collaborative)? Planning ensures the game aligns with your teaching goals rather than being just “fun”.
Choose the Right Mode for the Moment
Gimkit offers various modes; picking the right one matters:
- Classic Mode: Good for standard review, balanced pace.
- 2D modes (Map/Avatar‑based): Adds movement, exploration—great for engagement, but may distract learners if overused.
- Team‑based or collaborative modes: Useful for peer‑interaction, discussion. Tip: Switch modes periodically to keep novelty high.
Keep Player Load in Check
Large games are exciting but can strain devices/connection. According to Gimkit’s help docs, there’s a hard limit (~500 participants) but practical reliability may drop with large numbers. Gimkit Help If you’re handling remote learners with variable connectivity:
- Consider smaller groups.
- Use simpler modes for large groups.
- Ask participants to use reliable network or standardized device if possible.
Configure for Focus & Safety
- Enable Nickname Generator so students don’t choose distracting names. Gimkit Help
- Turn off “join in late” if you want to freeze the player list before starting.
- Use QR code link rather than code entry if devices are limited or you want swift entry.
- Monitor the lobby and remove any inappropriate participants before start. Gimkit Help
Make It Interactive, Not Just Competitive
Competition can drive engagement, but the learning comes from reflection:
- Consider pausing mid‑game to highlight a question many got wrong.
- After game end, review tricky questions with the class: “Why was this answer wrong? What did you think?”
- Encourage players to think, not only click fast.
Use Reports to Drive Next Steps
The post‑game report is a goldmine:
- Identify questions with high‑error rates → reteach or clarify those concepts.
- See individual student data → target extra help for those who struggled.
- Export PDFs and keep as evidence of formative assessment. By integrating these analytics into your teaching cycle, hosting becomes a strategic tool, not just a fun activity.
Keep Learners Coming Back
Some ideas to build engagement over time:
- Create a theme: “Gimkit Friday” or “Challenge of the Week”.
- Offer small rewards: praise, badges, leaderboard honour.
- Allow student‑led kits: let students create question sets for peers.
- Vary the format: one week speed‑review, next week collaborative mode, next week themed kit (holiday, subjects, etc). Variety + regularity = high engagement.
Technical Tips & Troubleshooting for Hosts
Even the best‑prepared sessions can hit glitches. Here’s how to pre‑empt and troubleshoot common issues as a Gimkit host.
Common Issues & Solutions
IssuePossible CauseRecommended FixStudents can’t joinWrong code, network issueDouble‑check code/link; ask students to refresh; share direct “join link” instead of just code.Lag / slow gameplayMany participants, weak connectionReduce number of players; switch off video for host; ensure host device has good connection.Inappropriate usernamesNickname generator offTurn on Nickname Generator. Gimkit HelpGame ends unexpectedly / time limit reachedMode setting default limitAdjust time/goal settings before start.Students stuck in lobby or can’t see screenBrowser/device compatibilityEnsure students use supported browser; ask them to clear cache; provide step‑by‑step join instructions.
Host Device Best Practices
- Use a stable computer/laptop rather than mobile, if possible.
- Connect to wired internet or strong WiFi.
- Close unnecessary browser tabs/apps to reduce load.
- Test a mini‑game (2‑3 players) in advance if first time using a new mode.
Pre‑Class Checklist for Hosts
- Kit ready and double‑checked (questions & answers accurate).
- Game mode selected and settings configured (time, goal, join in late, nickname generator).
- Players know how to join (link or code shared ahead).
- Host device and network tested and ready.
- Backup plan: e.g., if mode fails, have Classic mode ready.
- Post‑game review planned (which questions to revisit, how to use report).
Advanced Hosting Strategies

Ready to take your Gimkit hosting to the next level? These advanced approaches will help you design sessions that feel premium and high‑impact.
Layered Learning Through Game Phases
Break your session into phases:
- Warm‑up Round – Low stakes, easy questions to get students comfortable.
- Main Competitive Round – Higher stakes, tougher questions, full mode power.
- Challenge Round – Bonus questions or peer‑review mode, maybe student‑generated.
- Reflection Phase – View the report, discuss results, highlight misconceptions.
This structure gives students progression, keeps momentum, and turns the game into a full learning loop rather than a standalone event.
Use Themes & Narrative
- Create a narrative: “Mission Mars Review”, “Treasure Hunt Maths”, “Survival Science Questions”.
- Use custom visuals, backgrounds or language to fit the theme.
- This adds novelty and increases student buy‑in.
Student‑Driven Kits & Co‑Hosting
- Invite students to create a kit for peers (with your review). This fosters ownership and deeper learning.
- Co‑host with students: assign a student the lobby control or scoreboard commentary.
- Rotate student hosts so they learn how to manage games too.
Differentiated Learning Paths
- Create multiple kits for the same topic but differing difficulty levels (Beginner, Intermediate, Advanced).
- Use branching: after the first round, students self‑select a kit matching their pace.
- Host two parallel games and merge results to compare groups.
Data‑Driven Follow‑Up
- Use the post‑game report to create a customised mini‑quiz for students who struggled.
- Send individual feedback: “You missed questions on topic X — here’s a mini‑kit to improve”.
- Use leaderboard trends to motivate improvement over time and show progress.
How to Use Gimkit Hosting in Different Learning Environments
Whether you’re in‑person, remote, or hybrid, hosting a Gimkit session works — here’s how to adapt.
In‑Person Classroom
- Project the game code/QR code on screen.
- Ask students to join on their devices (tablet/laptop/phone) while you monitor the big screen.
- Physical movement: after a question round, ask students to move to different tables, discuss tricky questions or peer‑help.
- Use the leaderboard for lively classroom discussion (“Look who overtook the lead in the last minute!”).
Remote / Virtual Learning
- Share your screen with the host view so all participants see the game code and lobby.
- Use chat or breakout rooms to let students discuss questions after each round.
- Be mindful of connectivity issues: perhaps reduce the max number of players, keep rounds shorter, encourage students to use a stable connection and maybe close video.
Hybrid (Mixed In‑Person + Remote)
- Use dual screens: host device plus projection for classroom students; remote students join via link.
- Ensure remote students can see the same visuals (leaderboard, timer) as classroom students—consider a video conferencing tool plus screen share of Gimkit lobby/game.
- Encourage remote and in‑person students to form mixed teams for collaboration.
SEO & Engagement‑Friendly Elements
If you’re publishing this article on your school or educator blog, here are some suggestions for internal linking and optimizing the article for search:
- Link internally to other articles such as “Gamification in the Classroom”, “Best Online Review Tools for Teachers”, “How to Use Kahoot vs Gimkit”.
- Use keywords such as Gimkit host, how to host a Gimkit game, Gimkit live session for teachers, game‑based learning with Gimkit.
- Use subheadings (H2/H3) to structure content—search engines favour well‑structured, comprehensive articles.
- Include a table of contents at the top (if your platform allows) to make the article easier to navigate.
- Use bullet lists and numbered lists (as we’ve done) to increase readability and scan‑ability.
- Add an image or screenshot of the Gimkit host dashboard or game lobby—this improves visual appeal and engagement.
- Consider adding a video tutorial or embedded YouTube clip as a “how to” demonstration (which can boost dwell time).
Sample Subheadings with Keywords You Can Use
- What Does It Mean to Host a Gimkit Live Game?
- Step‑by‑Step Guide: How to Become a Gimkit Host
- Best Game Modes When You’re Hosting in Gimkit
- Configuring Game Options as the Host: Tips & Checklists
- How to Troubleshoot Common Issues When Hosting a Gimkit Session
- Advanced Host Strategies: Themes, Reflection, Student‑Led Kits
- Hosting Gimkit in In‑Person, Remote and Hybrid Environments
- Why You Should Use Gamified Review and How Hosting in Gimkit Helps
- Frequently Asked Questions About Being a Gimkit Host
FAQs
How many players can I host in a Gimkit live game? You can host up to 500 players in a live game according to the official Gimkit help documentation. However, practical performance may depend on network reliability and participant devices. Gimkit Help
Can I host a Gimkit game if I didn’t create the kit myself? Yes — you can host any public kit on Gimkit. But if you don’t own the kit, you won’t receive detailed post‑game reports. Gimkit Help
What game modes should I choose when I host a Gimkit session? That depends on your goals:
- For fast‑paced review: Classic or time‑based modes.
- For more dynamic, exploratory learning: 2D modes.
- For discussion or teamwork: collaborative or hybrid modes. Spend a few minutes reviewing mode options in the Mode Picker. Gimkit Help
How can I ensure students join smoothly when I host? Here are some tips:
- Share the join code or link clearly ahead of time.
- Use the QR code option for quick access. Gimkit Help
- Ask students to open the correct site (gimkit.com/join).
- Advise them to use reliable internet and close unnecessary tabs/applications.
- Consider enabling the nickname generator to avoid delays from students typing names.
What should I do after I end hosting a Gimkit game?
- Click View Report to see how your class performed and export PDF if needed. Gimkit Help
- Review which questions caused difficulty and include them in your next lesson or review kit.
- Provide personal feedback or assign a follow‑up kit for students who underperformed.
- Reflect on what worked: Was the game length appropriate? Did the mode suit your learners? Use this insight for future sessions.
Conclusion
Hosting a live game on Gimkit is far more than a fun classroom activity—it’s a strategic teaching tool when done thoughtfully. As a Gimkit host, you influence pace, engagement, fairness and ultimately learning outcomes. Here’s a quick recap of the key takeaways:
- Plan first: Know your objective, pick the right mode, configure settings accordingly.
- Set the environment: Use nickname generator, control join‑in‑late, limit players if needed.
- Engage learners: Start with a warm‑up, move into main round, finish with reflection and data review.
- Leverage data: Use post‑game reports for targeted follow‑up and continuous improvement.
- Adapt to context: In‑person, remote or hybrid — tailor your hosting strategy accordingly.
- Keep fresh: Use themes, student‑led kits, varied modes to maintain high engagement.
By applying these practices, you’ll transform your Gimkit sessions into high‑impact experiences that students enjoy and learn from. So next time you click “Play Live,” you’ll know you’re not just running a quiz—you’re leading an interactive, meaningful learning event.